but I am really not feeling confident enough yet to try the chair slipcover. I will eventually try it, but I am not ready, and I don't want to screw it up! I only say this because I was close to going to Joann's to pick up the stuff today, but I am waiting.
In the meantime, I will be doing Curbly's method for making fabric basket liners. Her youtube video makes it look SO easy! Now if only I could find a video tutorial to make ones for round/oval baskets! Jack's toys and blankets in the living room are kept in what looks like small wicker laundry baskets.
Sunday, August 30, 2009
Saturday, August 29, 2009
I improvised a pillowcase.
This afternoon after a disaster in the kitchen (to be recounted at a different day...let's just say primer met carpet), Nate and I decided on wings for dinner, so he went to pick them up. I decided to make a pillow case while he was gone, and then we would watch Shaun of the Dead.
So here goes!
I completely winged this whole thing. I even misplaced the pillowcase my mom gave me to use as a template. Ikea fabric. Sorry Chris, I know you don't like the 70's thing :-)
 Ugly red microfiber pillow that I have wanted to cover for awhile.
 Measured the pillow, cut the fabric and laid it out on the pillow to make sure it would fit. Here is where I made my mistake. I was just a bit short on fabric to fit comfortably, so I had to make sure to squeak out every single inch. I had the overlap going horizontal. If I had thought for a second to make it vertical (while still staying with the pattern), I would have had plenty of fabric to do it. Live and learn!
 Hemmed the long back edge. I then sewed the long back edge to the front, and the short back edge to the other end.
 Pinned right sides together to stitch the front to the back.
 Right after I made sure the pillow would fit.
 Just barrrrrrrrrrrrrrrrrely overlaps. More on this later.
 Turning it inside out to check for pillow fit one more time before I finish the last side.
 The pillow case would just not stay closed, it looked like an overstuffed turkey. So I had to figure out a way to keep it closed. I thought of maybe sewing it closed by hand, or maybe adding a button. In the end, since this is for a baby's room and will get messy, I need to be able to take it apart to wash. I cut two narrow strips of velcro and stitched them to the very edge of the back parts. I sewed them down.
 The finished product.
 The finished back, holding together just fine! This took me about a half an hour, mostly because of the problem with the short side and double checking for pillow fit (yes, I measured, but with the short end, I couldn't be sure it would all cover). Then I had to find the soft side of the velcro, turned out it was left in my car.

What I learned today:
So here goes!
I completely winged this whole thing. I even misplaced the pillowcase my mom gave me to use as a template. Ikea fabric. Sorry Chris, I know you don't like the 70's thing :-)
 Ugly red microfiber pillow that I have wanted to cover for awhile.
 Measured the pillow, cut the fabric and laid it out on the pillow to make sure it would fit. Here is where I made my mistake. I was just a bit short on fabric to fit comfortably, so I had to make sure to squeak out every single inch. I had the overlap going horizontal. If I had thought for a second to make it vertical (while still staying with the pattern), I would have had plenty of fabric to do it. Live and learn!
 Hemmed the long back edge. I then sewed the long back edge to the front, and the short back edge to the other end.
 Pinned right sides together to stitch the front to the back.
 Right after I made sure the pillow would fit.
 Just barrrrrrrrrrrrrrrrrely overlaps. More on this later.
 Turning it inside out to check for pillow fit one more time before I finish the last side.
 The pillow case would just not stay closed, it looked like an overstuffed turkey. So I had to figure out a way to keep it closed. I thought of maybe sewing it closed by hand, or maybe adding a button. In the end, since this is for a baby's room and will get messy, I need to be able to take it apart to wash. I cut two narrow strips of velcro and stitched them to the very edge of the back parts. I sewed them down.
 The finished product.
 The finished back, holding together just fine! This took me about a half an hour, mostly because of the problem with the short side and double checking for pillow fit (yes, I measured, but with the short end, I couldn't be sure it would all cover). Then I had to find the soft side of the velcro, turned out it was left in my car.
What I learned today:
- I really need to brainstorm a bit better when figuring out how to make something work. This would have been a perfect velcro free pillowcase otherwise. The color is a bit loud, but it is for Jack's room, which we are re-doing.
- I love pinking shears! They made this much easier. I only use them to trim edges, of course, but they make the corners seem sharper because there is less bulk under the seam.
- I was able to pin the hems on the back, but I did the rest freehand. I was finally able to a 1/4" seam without messing up, freehand. WOO!
- I suck at using Mod Podge, but the dresser for the baby's room might be done by sometime next week.
- Bird mobile will eventually get done. It was raining today, no park for us.
- Hung a mirror in Jack's room, which he adores! It is just high enough for him to watch himself when we stand him up to get his pants on. (As in...it is out of his reach while being changed).
- I might try my hand at a ButtercupBag but I would need to find the exact right fabric to make it worth my while. I really like the one they used on the site. I don't think I own a single yellow item. It makes me look sick. I love the color though, so sunshiney!
- Trying the Poang slipcover now that I think I have a clue as to how I should do it. I need to get some upholsery fabric for this one.
- Found the right color of twin bed sheet to make the bed skirt from, but for some reason, I didn't buy it. It was only $3, I don't know what I was thinking!
Friday, August 28, 2009
Finished!!
Here goes. This is a long one.
First, I finished the messed-up bodice from last night (I watched Project Runway this afternoon and picked out all the old stitches, that was fun). It was pretty easy to finish, so I figured I could keep going.
 Next was doing the darts on the actual skirt. Not too hard. I did OK on the first one. Darker fabric, maybe I thought my mistakes wouldn't show? Anyway, this side turned out OK.
 Here is the darts on the flip side. Didn't do so well here. I didn't really think about which string would go on top, bobbin or needle, and they needed to be ironed inward, so this looks kinda funky and wrong. Oh and my thread kept on desentegrating. It got thinner and thinner and finally broke, it happened about 6 times.
 I figured I had some time, so I moved on to the straps. I sewed them with a 1/4 inch allowance all the way around. Right sides together! I was amazed at how this pattern was able to mask a lot of my bad cutting mistakes.
Finished and turned straps. In between this and the last picture, and emergency sewing call was placed to my mom. I didn't actually know what topstitching was. Luckily, she was available. Next thing I did (this might have actually been done after the darts were done, it is all a blur!)was to sew the bodice to the skirt for each side. This part was very simple and easy. I didn't even screw it up once!
 The flip side, bodice sewn to skirt. I sewed the straps on right after this. I sewed them directly under the bottom bodice accent strip.
 After the straps were sewn on, I had to gather and pin the straps so they wouldn't get in the way. It was time to sew front to back! Right side together, I pinned the whole shebangabang. This was actually not very difficult, either.
 I trimmed the excess edging with my trusty pink pinking shears. Maybe not so trusty, I just got them (yay mom!), but they worked!
 Here I am sewing on the bias binding. This part was not hard for the first side. After that, it sucked. I had to take it to the mirror, figure out how long I wanted it to be, and pin it all while wearing it. The binding was much easier to work with (initially) than I thought it would be. It called for hand-ladder stitching but I rejected that part of the instructions and just topstitched the bias binding after initially applying it. It turned out OK. Now I wish I had taken the time to hand stitch, but it is my first apron, I think I can be forgiving to myself. I had to double up on the neck so it wouldn't open up due to my cruddy cutting skills.
 My model with the finished product...that's my dear husband who shall remain nameless.
  The flip side, the side I really love.
  What did I learn?
We are picking up the sticks to finish the bird mobile this weekend, but it is possible instead of a mobile, it might become a wall hanging. Like this one, from Flikr. I have a few other crafty things planned this weekend (or maybe just stuff I don't normally do). I have to patch some holes in the paint in Jack's room, and maybe do a few wall hangings. I will steal any and all ideas off of this fantastic site with allll sorts of baby rooms (including toddler rooms, yay!). I love all the themes in there. As I have said before, I am not much of a "theme" type of person, but owls and birds are calling to me. Especially owls. Love them. I might try to get some felt to work with, because there are some cute patterns for felt owls out there. I even covet this owl diaper (no way would I ever spend that much on a diaper, but I love the pattern).

My next sewing project will be to make a pillowcase cover for a hideous pillow in the living room, to be used in Jack's room (in the Poang chair, not his crib, silly). I will make it out of one of the fabrics that the birds is made out of so it will have some matchy-matchy to it but I am not sure which one. Also going to make a bedskirt for Jack's crib. We keep a lot of crap (excess cloth diapers, stuff for daycare) under there, so I would like to keep it covered if at all possible.
First, I finished the messed-up bodice from last night (I watched Project Runway this afternoon and picked out all the old stitches, that was fun). It was pretty easy to finish, so I figured I could keep going.
 Next was doing the darts on the actual skirt. Not too hard. I did OK on the first one. Darker fabric, maybe I thought my mistakes wouldn't show? Anyway, this side turned out OK.
 Here is the darts on the flip side. Didn't do so well here. I didn't really think about which string would go on top, bobbin or needle, and they needed to be ironed inward, so this looks kinda funky and wrong. Oh and my thread kept on desentegrating. It got thinner and thinner and finally broke, it happened about 6 times.
 I figured I had some time, so I moved on to the straps. I sewed them with a 1/4 inch allowance all the way around. Right sides together! I was amazed at how this pattern was able to mask a lot of my bad cutting mistakes.
Finished and turned straps. In between this and the last picture, and emergency sewing call was placed to my mom. I didn't actually know what topstitching was. Luckily, she was available.
 Next thing I did (this might have actually been done after the darts were done, it is all a blur!)was to sew the bodice to the skirt for each side. This part was very simple and easy. I didn't even screw it up once!
 The flip side, bodice sewn to skirt. I sewed the straps on right after this. I sewed them directly under the bottom bodice accent strip.
 After the straps were sewn on, I had to gather and pin the straps so they wouldn't get in the way. It was time to sew front to back! Right side together, I pinned the whole shebangabang. This was actually not very difficult, either.
 I trimmed the excess edging with my trusty pink pinking shears. Maybe not so trusty, I just got them (yay mom!), but they worked!
 Here I am sewing on the bias binding. This part was not hard for the first side. After that, it sucked. I had to take it to the mirror, figure out how long I wanted it to be, and pin it all while wearing it. The binding was much easier to work with (initially) than I thought it would be. It called for hand-ladder stitching but I rejected that part of the instructions and just topstitched the bias binding after initially applying it. It turned out OK. Now I wish I had taken the time to hand stitch, but it is my first apron, I think I can be forgiving to myself. I had to double up on the neck so it wouldn't open up due to my cruddy cutting skills.
 My model with the finished product...that's my dear husband who shall remain nameless.
  The flip side, the side I really love.
  What did I learn?
- I learned that I should have picked up a simpler first real pattern project. Though having done this, I think attempting a pillowcase or three won't be hard at all.
- I figured out how to have the thread break but still make it look OK. I had to just keep the presser foot down and not move the fabric while I did my repairs.
- 1 yard=36". I bet all of you knew that. Neither I nor my husband did.
- This apron is missing one very important element. A pocket! Where will I keep my gin now?
- I was able to do the straps in one continuous stitch. A BIG first, so I learned how to sew a straight line. Three cheers for me!
- I think it turned out pretty cute except the stitches on the halter neck binding. Just meh on that part. My fault, for not doing it by hand (and having crappy cutting skills).
We are picking up the sticks to finish the bird mobile this weekend, but it is possible instead of a mobile, it might become a wall hanging. Like this one, from Flikr.
 I have a few other crafty things planned this weekend (or maybe just stuff I don't normally do). I have to patch some holes in the paint in Jack's room, and maybe do a few wall hangings. I will steal any and all ideas off of this fantastic site with allll sorts of baby rooms (including toddler rooms, yay!). I love all the themes in there. As I have said before, I am not much of a "theme" type of person, but owls and birds are calling to me. Especially owls. Love them. I might try to get some felt to work with, because there are some cute patterns for felt owls out there. I even covet this owl diaper (no way would I ever spend that much on a diaper, but I love the pattern).
My next sewing project will be to make a pillowcase cover for a hideous pillow in the living room, to be used in Jack's room (in the Poang chair, not his crib, silly). I will make it out of one of the fabrics that the birds is made out of so it will have some matchy-matchy to it but I am not sure which one. Also going to make a bedskirt for Jack's crib. We keep a lot of crap (excess cloth diapers, stuff for daycare) under there, so I would like to keep it covered if at all possible.
Thursday, August 27, 2009
Holy Hell this better be the hardest part
Or else this apron will be burned. Burned I say! I started the bodice today. Holy crap.
First we start with the lovely bodice piece.
 Then we follow the directions and do one stitch at 3/8" and one at 1/4". As you can see, I do not have a steady hand, and I overlapped them a few times (as well as having major bobbin issues).
 This is when I tried to do the gathers on it. I was supposed to pull the long bobbin string on each side. Dumbass me pulled the bobbin string ...for the same line of stitching at the same time. Which meant I was pulling against myself. DUH that is why there are two lines, moron.
 This was so knotty, out of line, and generally messed up that it would not gather at all.
 So we gently place it aside to work on later. (Ok, what really happened is I said "fuck you, bodice" but whatev)
 So I start on the reverse side. This side went muuuuch easier. Very few snags in this side, and I was able to keep a steady and straight hand. The directions were a bit ambiguous on attaching the trim but I figured it out.
 See? I figured it out. It still looks scrappy because the edges will be finished with bias tape. This apron is going to be cute and stained with my blood. Or my husband's. This is why I am taking it slow, people :-)
 What did I learn today:
Finish the bodice tomorrow. I believe next are the straps. Woo.
First we start with the lovely bodice piece.
 Then we follow the directions and do one stitch at 3/8" and one at 1/4". As you can see, I do not have a steady hand, and I overlapped them a few times (as well as having major bobbin issues).
 This is when I tried to do the gathers on it. I was supposed to pull the long bobbin string on each side. Dumbass me pulled the bobbin string ...for the same line of stitching at the same time. Which meant I was pulling against myself. DUH that is why there are two lines, moron.
 This was so knotty, out of line, and generally messed up that it would not gather at all.
 So we gently place it aside to work on later. (Ok, what really happened is I said "fuck you, bodice" but whatev)
 So I start on the reverse side. This side went muuuuch easier. Very few snags in this side, and I was able to keep a steady and straight hand. The directions were a bit ambiguous on attaching the trim but I figured it out.
 See? I figured it out. It still looks scrappy because the edges will be finished with bias tape. This apron is going to be cute and stained with my blood. Or my husband's. This is why I am taking it slow, people :-)
 What did I learn today:
 - Going slow when using the machine is not a good idea. When I was doing this, I was all over the place. When I just went fast (like ripping off a bandaid) the seam was pretty straight.
- Gathers suck.
- Gathers look cute when they are done.
- I am going to be spending a ton of time with a seam ripper and some needles for picking. No freaking way am I going to re-sew or re-cut the paisley piece. There isn't a picture of it, but I got the bottom of that one gathered and trimmed...the top is too far gone. Gotta start that one again, it is like a maze of stitches and all bound up.
Finish the bodice tomorrow. I believe next are the straps. Woo.
Mid-afternoon crafting
I am kinda bored here while my son naps (the washer/dryer are near his room so no way am I doing any opening/closing of doors right now!). I decided to start the bias tape. I watched a few more Youtube tutorials on the stuff, and thought to myself, "I got this!". Boy oh boy.
I had to mutilate my ironing board cover (which is kinda ratty anyway, so its fine) to poke a skewer through to give me some stabilizer/folder. I had no long pins.
 A few videos I watched give explanation as to why one side of bias tape is longer than the other, so I tried to keep that in mind while I was ironing this. This has helped me see how truly horrible I am with scissors...the edges were so not even remotely even from the cutting last night. I think I covered it up pretty good, though. EDIT: Yes, this bias tape is done correctly. I am using the "wrong" side of the paisley print for the "coordinating fabric".
  Here is the finished product. 2.5 yards of custom bias tape. Yippie.
 See what I mean about the unevenness? Oh well, better luck next time.
 I missed a step in step 1 of the directions, which was to put the heat stuff on the top bodice strap. So I did that just now, and the first one turned out OK. I had to re-cut the second one due to the fact that I ironed it on the incorrect side (the "right" side).
 What did I learn?
- Cut your items on a table. Please. Really. A lot of headaches can be avoided if I cut better next time.
- Bias tape is available to buy for a reason. Next time, I would buy it instead of taking the time to make it. Sure, it is good for a custom color or size, but I would rather buy it if I could!
- There is a Youtube video on how to sew on bias tape without swearing. I wish she had one on MAKING bias tape without swearing. She is really funny, and I would totally watch it. I know, there are bias tape makers out there. Don't care. Will buy next time unless in desperation.
Wednesday, August 26, 2009
Apron Part Deux
Still no sewing has taken place!
I got home kinda late tonight, so I cut the straps while I watched Toddlers and Tiaras. Judge if you must. Here are the pieces, I needed two of each, and the two long pieces had to be taped together.
 Cutting on the floor is tedious (and severely crappy) work. I will use the table next time.
 Here is me cutting the bias straps. I had to make them 4" wide. They were cut mostly OK, but the chalk wheel doesn't like working on the carpet. Oh and I used it on the incorrect side. For this part, the "wrong" side is the "right" side because this is going to be the outside of my straps and bodice.
 Everything I cut. It took fooooooooorever. Don't worry, I neatened it up before I put it away. I also rummaged through the stuff my mom sent with the sewing machine, and some of that binding I was talking about last post was in there, so I don't actually have to go out and buy anything (bonus!).
 What I learned today:
ETA:
I did a little more research on bias binding (aka bias tape). Youtube is SUCH a great resource for sewing tutorials, and I found one on making bias tape, and one on using bias tape.
Making bias binding in a pretty simple way
What is bias binding used for? How does it work?
I got home kinda late tonight, so I cut the straps while I watched Toddlers and Tiaras. Judge if you must. Here are the pieces, I needed two of each, and the two long pieces had to be taped together.
 Cutting on the floor is tedious (and severely crappy) work. I will use the table next time.
 Here is me cutting the bias straps. I had to make them 4" wide. They were cut mostly OK, but the chalk wheel doesn't like working on the carpet. Oh and I used it on the incorrect side. For this part, the "wrong" side is the "right" side because this is going to be the outside of my straps and bodice.
 Everything I cut. It took fooooooooorever. Don't worry, I neatened it up before I put it away. I also rummaged through the stuff my mom sent with the sewing machine, and some of that binding I was talking about last post was in there, so I don't actually have to go out and buy anything (bonus!).
 What I learned today:
- Cutting bias straps is almost a little fun, because the scissors go through easily. Notice I said almost.
- I should use the table instead of the floor for cutting, I bet it would cut my time in half, if not more.
- I need to pay better attention to the "right" and "wrong" side thing.
ETA:
I did a little more research on bias binding (aka bias tape). Youtube is SUCH a great resource for sewing tutorials, and I found one on making bias tape, and one on using bias tape.
Making bias binding in a pretty simple way
What is bias binding used for? How does it work?
Tuesday, August 25, 2009
Started the apron!
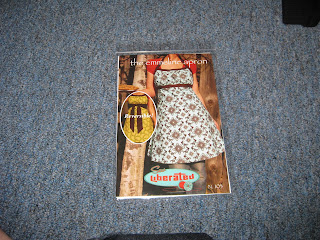
So I started the Emmeline apron from Sew Liberated today. I read over the instructions (ok, ok, I started reading after I started cutting...yell at me later).
Here is the pattern.
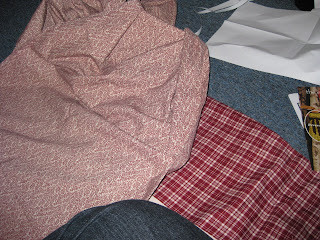
 Here are my fabrics. The top is a cream/red paisley. It is very pretty and soft. The bottom, just plaid (yes, a directional pattern, what was I thinking?) Ok, I didn't really pick these out, I got them from my mom's huge fabric stash. I love paisley and the plaid is very close in color.
 Cutting side 1. I cut this one with scissors. I didn't expect the pattern to be paper, more that filmy stuff I remember it being made of. It wasn't easy, as I cannot cut a straight line unless I cut 1" at a time.
 This is the flip side of the paisley print. I am going to use this for the straps, it coordinates with the plaid side very well, and the paisley is barely visible through it.
 Cutting side 2, using the rotary cutter, cutting mat, and ruler.
 When I read the pattern, it includes darts. Yes, I know what darts are. No, I have no idea if that is too advanced for me or not. It took me a good 5 minutes to draw them on with my pretty pink tailors chalk. 6"long, 1" apart.

This is going to be a slow-going project for me. Not because it is overly difficult, but because there are a lot of things "new" to me, such as darts and gathering. I didn't finish cutting yet, because I want to do the straps tomorrow. I am going to try and do a little each night, but since school starts up again next Thursday, I want to spend as much time with my son as I possibly can.
Things I need to learn:
Here is the pattern.
 Here are my fabrics. The top is a cream/red paisley. It is very pretty and soft. The bottom, just plaid (yes, a directional pattern, what was I thinking?) Ok, I didn't really pick these out, I got them from my mom's huge fabric stash. I love paisley and the plaid is very close in color.
 Cutting side 1. I cut this one with scissors. I didn't expect the pattern to be paper, more that filmy stuff I remember it being made of. It wasn't easy, as I cannot cut a straight line unless I cut 1" at a time.
 This is the flip side of the paisley print. I am going to use this for the straps, it coordinates with the plaid side very well, and the paisley is barely visible through it.
 Cutting side 2, using the rotary cutter, cutting mat, and ruler.
 When I read the pattern, it includes darts. Yes, I know what darts are. No, I have no idea if that is too advanced for me or not. It took me a good 5 minutes to draw them on with my pretty pink tailors chalk. 6"long, 1" apart.
This is going to be a slow-going project for me. Not because it is overly difficult, but because there are a lot of things "new" to me, such as darts and gathering. I didn't finish cutting yet, because I want to do the straps tomorrow. I am going to try and do a little each night, but since school starts up again next Thursday, I want to spend as much time with my son as I possibly can.
Things I need to learn:
- I don't know if it will be a problem, but I marked the darts with chalk before I ironed. Bloody pink mess? We shall see.
- I need to buy something I have never heard of: 1/4 yard of lightweight fusible interfacing such as Pellon's 880. I have no idea what that is. (In the three minutes of research I just did, it appears that it is a stabilizer, which gives a bit of crispness to the item without being stiff, and I gather kind of "glues" the sides together?).
- I have to make a bias strap. I have a clue as to what this is, but will have to go VERY slowly through the directions so as to not screw them up.
- Hand stitch a ladder stitch. Thankfully, there is a visual. I know "Michelle's Stitch" which basically just gets it together. I think it is a basting stitch, but who the hell knows.
Monday, August 24, 2009
Eleven little birdies, sittin in a tree!
I got the birdies done today! I figured out a way to make "baby" birds, too. I just cut a few inches from the original pattern. Not exactly like I had hoped they would turn out, but they will work. They are the third from the left, and the first on the right. This go was much easier than last night, it only took about 1/3 of the time, for more birds. The sewing was especially easy. I still had to hand-sew some holes (the seam at the head is not real sturdy).
 Finished birdies!
 We are going to go to Taughannock Falls this weekend to hunt sticks to make the mobile. I think we are going to move Jack's crib to the opposite wall from where it is now, and hang the mobile in the corner by the window.

What did I learn today?
I think I might have made too many birds. That is OK, it will give me choices when making the actual mobile. These were very forgiving when it came to the seam length, so I liked that. I figured out an easier way to turn them inside out, as well. I love this trial/error thing!
Upcoming Projects:
Emmeline apron by Sew Liberated. Pillowcases for the ugly red pillows in the living room (I might try my hand at a zipper for this one!). Still looking for a good tutorial/pattern for a Poang slipcover. Breathable bumpers for Jack's crib. I have to find some cream colored mesh for that.
I think I am also going to try my hand at a crib skirt for Jack. He has a mini-crib so I will have to wing the pattern (or actually measure), but I think it will be pretty easy. I will get one of the cheapy twin sheets from Walmart or something, they are around $2 right now with Back To School.
ETA: I was perusing Montessori By Hand's blog again, and I kind of absolutely love this idea .
I am not a Montessorian by any means, but I think the reasoning behind it is so cool! (A message to his Uncle Logan: I will make sure to put my son in manly apron prints, like John Deere or Playboy Bunnies, sound good?)
 Finished birdies!
 We are going to go to Taughannock Falls this weekend to hunt sticks to make the mobile. I think we are going to move Jack's crib to the opposite wall from where it is now, and hang the mobile in the corner by the window.
What did I learn today?
I think I might have made too many birds. That is OK, it will give me choices when making the actual mobile. These were very forgiving when it came to the seam length, so I liked that. I figured out an easier way to turn them inside out, as well. I love this trial/error thing!
Upcoming Projects:
Emmeline apron by Sew Liberated. Pillowcases for the ugly red pillows in the living room (I might try my hand at a zipper for this one!). Still looking for a good tutorial/pattern for a Poang slipcover. Breathable bumpers for Jack's crib. I have to find some cream colored mesh for that.
I think I am also going to try my hand at a crib skirt for Jack. He has a mini-crib so I will have to wing the pattern (or actually measure), but I think it will be pretty easy. I will get one of the cheapy twin sheets from Walmart or something, they are around $2 right now with Back To School.
ETA: I was perusing Montessori By Hand's blog again, and I kind of absolutely love this idea .
I am not a Montessorian by any means, but I think the reasoning behind it is so cool! (A message to his Uncle Logan: I will make sure to put my son in manly apron prints, like John Deere or Playboy Bunnies, sound good?)
Subscribe to:
Posts (Atom)
